Смяна лайсните над прозореца - E36 купе
Модератори: vld, bum_bum, ///Leonix, Технически модератори
17 мнения
• Страница 1 от 2 • 1, 2
- BT9028BA
- старши ентусиаст
-

- Мнения: 2253
- Регистриран на: 22.01.2007
- Местоположение: В.Търново
- Пол: Мъж
- Кара: ...don`t drive fast, just fly low
- Мечтае да кара: E36 M3
Смяна лайсните над прозореца - E36 купе
![]() от BT9028BA » 02 Яну 2010, 20:11
от BT9028BA » 02 Яну 2010, 20:11
Ако може някой който ги е махал тия лайстни и после ги е монтирал обратно да обясни кое как става - как се захващат и други неща които трява да се знаят преди да започнеш да ги сменяш
Номер 11
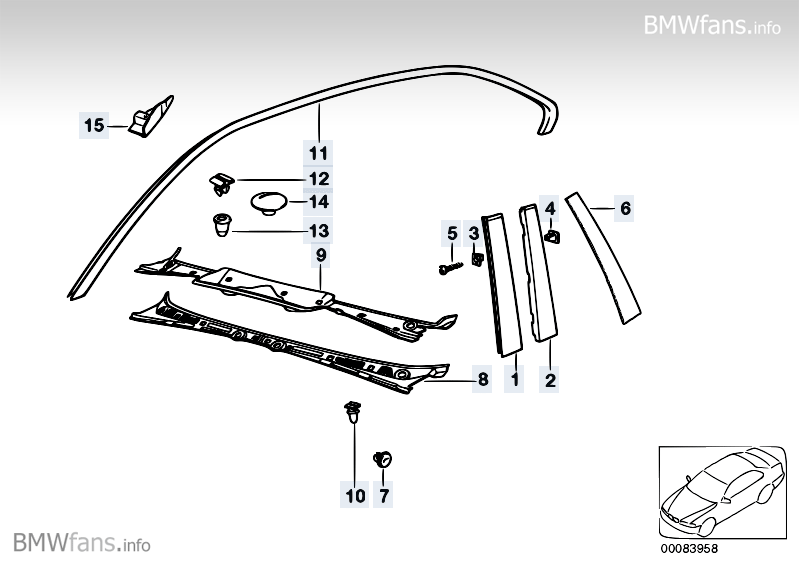
Номер 11
Последна промяна BT9028BA на 03 Яну 2010, 0:40, променена общо 2 пъти
- fedoracore
- старши ентусиаст
-

- Мнения: 1573
- Регистриран на: 30.10.2007
- Местоположение: Столицата
- Пол: Мъж

- BT9028BA
- старши ентусиаст
-
- Мнения: 2253
- Регистриран на: 22.01.2007
- Местоположение: В.Търново
- Пол: Мъж
- Кара: ...don`t drive fast, just fly low
- Мечтае да кара: E36 M3
Re: Как се маха тази лайстна
![]() от BT9028BA » 02 Яну 2010, 23:11
от BT9028BA » 02 Яну 2010, 23:11

Последна промяна BT9028BA на 03 Яну 2010, 0:49, променена общо 1 път
- Smoocki
- старши ентусиаст
-

- Мнения: 2073
- Регистриран на: 6.08.2006
- Местоположение: София
- Пол: Мъж
- Кара: 600 коня с умивна на лицето
- Мечтае да кара: всичко бързо на четири гуми
- Детайли за колата: Garrett 3582
Re: Как се маха тази лайстна
![]() от Smoocki » 02 Яну 2010, 23:30
от Smoocki » 02 Яну 2010, 23:30
Тук намерих малко инфо ,но няма снимки :
Alright Bro, here you go.
To remove properly:
Start by pulling down the top door seal:
Then move to the rear and pull off your rear C pillar.
Then unbolt your hinge:
Then Pull out the main rear gasket AND the secondary gasket. If your 2nd gasket is ripped, replace it, it's cheap: Also, pay attention to the 2nd gaskets orientation, cause Im not going to explain how it goes back in.
Start at the fender side corner, and pull on the trim from the inside, NOT THE OUTSIDE.
Then proceede to work back:
Work slowly and evenly, don't just rip it off... move 6 inches at a time. Sometimes it may only come down a little bit a time too.
Problem areas:
Fender corner: use a screw driver to slightly pry out the fender, it doesnt take much force.
The rear window flat edge trim: push it in, then pull down on the ledge trim.
You should have it off in a matter of minutes, unbent:
To install:
Start the opposite way of removal.
Start at the rear corner. You should be able to have it back on in 5 minutes or less, undamaged.
Work progressively, dont just force one section all the way in at a time. You may need to push the whole thing in halfway, then come back for final fitment.
И още малко :
It's pretty bothersome to do, but it works out well if you are patient..
There are a couple ways to do it yourself. one is fairly quick and not too messy, but it doesn't always turn out very well, and the other is very messy, time consuming, and often frustrating.
The reason for your headliner falling down is that the foam or glue on the foam that holds.the headliner cloth to the cardboard (or whatever) headliner "board" deteriorates with age, and turns into crumbs and goo, and can't hold together any more. It usually will last at least 10 years before it starts to let loose.
You can either re-glue the cloth up with a lot of spray adhesive (3M Super 77 is the most commonly used one, about $6 -$8 for a large spray can), or replace the foam with new, fresh foam and either use the original cloth or some new cloth, and still use the same spray glue.
The cloth used on the headliner is very stretchy and thin, and probably came form the manufacturer with the foam pre-attached to it, so that the car maker could just glue it to the headliner board, stamp it out and stuff it into the car. I you replace the old foam and go to reuse the cloth, it probably will stretch out a little larger than it was before, not a problem, as long as you don't wrinkle it.
The easy, fast way is to spray the glue through a little hole in the cloth with a tube, so you don't have to take everything apart just to re-stick it up again.
Don't use so much that it soaks the cloth!
Often this winds up lumpy,cratered, or wrinkled, but only people in the back seat will usually notice it much.
Most people don't care, as long as the headliner isn't in their hair.
The slow, bothersome way is to
1. remove the interior window trim and
2. either the headliner cloth or the whole headliner, and
3. scrape all of the foam crumbs off, down to the solid board,
4. get as much crumbs off the cloth as possible,
5. cut fresh foam for the headliner,
6. spray glue on the foam and the back side of the cloth,
7. glue them together, and
8. then glue them to the board,
9. put all the trim back and
you have a nice, long lasting headliner.

- Smoocki
- старши ентусиаст
-
- Мнения: 2073
- Регистриран на: 6.08.2006
- Местоположение: София
- Пол: Мъж
- Кара: 600 коня с умивна на лицето
- Мечтае да кара: всичко бързо на четири гуми
- Детайли за колата: Garrett 3582
Re: Как се маха тази лайстна
![]() от Smoocki » 03 Яну 2010, 0:27
от Smoocki » 03 Яну 2010, 0:27
До сега се рових ,но го намерих отговора на въпроса на Тедо ето го
http://www.adamnitti.com/misc/trim_install.html
Replacing Driver’s Side Window Trim on an E36 Coupe
What you’ll need:
-Driver’s side trim piece from the dealer, part # 51 13 1 977 681
-Small pair of pliers
-Small scribe or punch
-Liquid silicon spray or similar
-Rubber hammer or mallet
-Masking tape or similar
Note: This prodedure is identical for the passenger side, as well. Just make sure you pick up the correct part from the dealer.
First you’ll have to remove the old trim piece, of course. You’ll definitely want to start from the front edge or the rear edge of the trim piece. It will make your life much easier. Having now completed the job, I think the install is simpler if you begin from the rear edge, because of the curvature of the trim piece there.
The rear edge is slightly recessed into a black rubber trim piece that lines the lower edge of the rear window. You’ll have to first pry the edge of the trim piece being replaced from this piece very carefully. I started by bending the edge away from the body with a tiny screwdriver, and then continuing using a small pair of pliers.

With the lower edge free from the mounting edge on the body, now you are free to start pulling the trim piece completely off. Using both hands (so that you can keep the sharp aluminum edge from scratching your paint work), carefully pull the piece away from the body. You may have to muscle it a little; over time, moisture and dirt seem to create a bit of an ‘adhesive’ between the trim piece and the body.

The trim piece will bend and crease as you pull. Each time the trim piece ‘folds’, it’s a little harder to pull away, so try to avoid bending it too sharply.

Notice as you remove the piece how it attaches to the body. There is a mounting edge that the trim piece clamps around. When you install the new piece you will have to make sure you align to this edge evenly.

You’ll notice that the rear edge of the trim end is quite sharp. It’s a good idea to wrap the edge in tape so that it won’t scratch your car if it accidentally hits the side of it.

Once you get the piece completely off, you’ll see that the mounting edge is probably a little crusty and will need to be cleaned.

I took a rag and some rubbing alcohol and cleaned all of the dirt and oxidation off of the edge. I then followed that up with the application of some cleaner wax. This shined up the edge pretty well and also created a nice smooth surface that made installation of the new piece much easier. Here you can see the cleaned edge. Final result matched the look of the rest of the body.

Now you can start installing the new trim piece. Once again, start from the rear edge. Make sure to recess the edge into the rubber piece mentioned earlier. You don’t want to mount the trim piece too high... Obviously, it will affect the proper fitment.
Once again, to prevent damage to your bodywork, you will want to tape the front edge of the trim piece just in case it hits the car.

Now you are ready to continue. Once you push the rear edge into place, you can start to press the rest of the piece onto the mounting edge of the body.

As you move up the window, you will quickly realize that mere pressing with the hands will not ‘pop’ the piece into place. You will now want to utilize a rubber hammer or mallet to knock it into place without damaging it. Another tip that will help you out is to spray some liquid silicon lubricant along the top edges of the trim piece so that it pops in easier.
I held the rubber hammer against the window and slid it across the glass as I struck the trim piece. Striking it in this way will prevent you from accidentally directing your striking force to the window, itself.

Now here is where it gets a little tricky... Once you get to the driver’s side window, you’ll have to make sure that the trim piece seats in between the edges of the rubber window seal behind the mounting edge. This is the most time consuming part of the job, so be patient. If you don’t get this right, you risk damaging the rubber seal or mounting the trim piece incorrectly. If you’re not sure how it is supposed to mount, look at the passenger side and compare.
The best way to do this, in my opinion, is to use a tool like a scribe or a punch to ‘guide’ the placement of the rubber seal upper channel as you mount the trim piece.
[img]http://media.snimka.bg/5227/016708901.jpg[img]
It helps to slide the scribe along the edge of the seal as you press the trim piece into place.

Once you get to the front edge of the trim piece, you may find that the front fender edge that meets the ‘A’ pillar doesn’t provide enough of a gap to press the rest of the trim piece in place. (This may not be the case with your car; my car happened to exhibit this trait, for some reason.)
To get around this, you need to be able to VERY SLIGHTLY pull the fender edge away to create enough space to fit the trim edge. A safe way to do this is to take a very thin piece of wood shim, say, no more than 1/4” thick, and press it behind the edge of the fender where it meets the ‘A’ pillar.

This provides all the clearance you will need to finish the job. Hammer the rest of the edge in, and, VIOLA! You’re done.
http://www.adamnitti.com/misc/trim_install.html
Replacing Driver’s Side Window Trim on an E36 Coupe
What you’ll need:
-Driver’s side trim piece from the dealer, part # 51 13 1 977 681
-Small pair of pliers
-Small scribe or punch
-Liquid silicon spray or similar
-Rubber hammer or mallet
-Masking tape or similar
Note: This prodedure is identical for the passenger side, as well. Just make sure you pick up the correct part from the dealer.
First you’ll have to remove the old trim piece, of course. You’ll definitely want to start from the front edge or the rear edge of the trim piece. It will make your life much easier. Having now completed the job, I think the install is simpler if you begin from the rear edge, because of the curvature of the trim piece there.
The rear edge is slightly recessed into a black rubber trim piece that lines the lower edge of the rear window. You’ll have to first pry the edge of the trim piece being replaced from this piece very carefully. I started by bending the edge away from the body with a tiny screwdriver, and then continuing using a small pair of pliers.
With the lower edge free from the mounting edge on the body, now you are free to start pulling the trim piece completely off. Using both hands (so that you can keep the sharp aluminum edge from scratching your paint work), carefully pull the piece away from the body. You may have to muscle it a little; over time, moisture and dirt seem to create a bit of an ‘adhesive’ between the trim piece and the body.
The trim piece will bend and crease as you pull. Each time the trim piece ‘folds’, it’s a little harder to pull away, so try to avoid bending it too sharply.
Notice as you remove the piece how it attaches to the body. There is a mounting edge that the trim piece clamps around. When you install the new piece you will have to make sure you align to this edge evenly.
You’ll notice that the rear edge of the trim end is quite sharp. It’s a good idea to wrap the edge in tape so that it won’t scratch your car if it accidentally hits the side of it.
Once you get the piece completely off, you’ll see that the mounting edge is probably a little crusty and will need to be cleaned.
I took a rag and some rubbing alcohol and cleaned all of the dirt and oxidation off of the edge. I then followed that up with the application of some cleaner wax. This shined up the edge pretty well and also created a nice smooth surface that made installation of the new piece much easier. Here you can see the cleaned edge. Final result matched the look of the rest of the body.
Now you can start installing the new trim piece. Once again, start from the rear edge. Make sure to recess the edge into the rubber piece mentioned earlier. You don’t want to mount the trim piece too high... Obviously, it will affect the proper fitment.
Once again, to prevent damage to your bodywork, you will want to tape the front edge of the trim piece just in case it hits the car.
Now you are ready to continue. Once you push the rear edge into place, you can start to press the rest of the piece onto the mounting edge of the body.
As you move up the window, you will quickly realize that mere pressing with the hands will not ‘pop’ the piece into place. You will now want to utilize a rubber hammer or mallet to knock it into place without damaging it. Another tip that will help you out is to spray some liquid silicon lubricant along the top edges of the trim piece so that it pops in easier.
I held the rubber hammer against the window and slid it across the glass as I struck the trim piece. Striking it in this way will prevent you from accidentally directing your striking force to the window, itself.
Now here is where it gets a little tricky... Once you get to the driver’s side window, you’ll have to make sure that the trim piece seats in between the edges of the rubber window seal behind the mounting edge. This is the most time consuming part of the job, so be patient. If you don’t get this right, you risk damaging the rubber seal or mounting the trim piece incorrectly. If you’re not sure how it is supposed to mount, look at the passenger side and compare.
The best way to do this, in my opinion, is to use a tool like a scribe or a punch to ‘guide’ the placement of the rubber seal upper channel as you mount the trim piece.
[img]http://media.snimka.bg/5227/016708901.jpg[img]
It helps to slide the scribe along the edge of the seal as you press the trim piece into place.
Once you get to the front edge of the trim piece, you may find that the front fender edge that meets the ‘A’ pillar doesn’t provide enough of a gap to press the rest of the trim piece in place. (This may not be the case with your car; my car happened to exhibit this trait, for some reason.)
To get around this, you need to be able to VERY SLIGHTLY pull the fender edge away to create enough space to fit the trim edge. A safe way to do this is to take a very thin piece of wood shim, say, no more than 1/4” thick, and press it behind the edge of the fender where it meets the ‘A’ pillar.
This provides all the clearance you will need to finish the job. Hammer the rest of the edge in, and, VIOLA! You’re done.
Последна промяна Smoocki на 03 Яну 2010, 0:52, променена общо 2 пъти
- beco109
- младши ентусиаст
-

- Мнения: 516
- Регистриран на: 27.01.2009
- Местоположение: Русе
- Пол: Мъж
- Кара: Разумно
- Детайли за колата: Измамна


Re: Смяна на лайстните над прозореца за Е36 Купе
![]() от sonny » 03 Яну 2010, 0:36
от sonny » 03 Яну 2010, 0:36
С тази разлика, че е хем по-безопасно за боята, хем по-лесно и по-здрави излизат, ако се свалят отпредназад,а не отзад напред и е хубаво при монтажа да се почукват по ръба с гумен чук, да се набият на вътре хубаво.
- deemov
- младши ентусиаст
-
- Мнения: 276
- Регистриран на: 22.09.2006
- Местоположение: Русе
- Пол: Мъж
- Кара: ///M Sport Edition
Re: Смяна лайсните над прозореца - E36 купе
![]() от deemov » 03 Яну 2010, 0:44
от deemov » 03 Яну 2010, 0:44
Много полезна тема, а дали е трудно да се смънат непокътнати или после по-добре да земам нови 
- BT9028BA
- старши ентусиаст
-
- Мнения: 2253
- Регистриран на: 22.01.2007
- Местоположение: В.Търново
- Пол: Мъж
- Кара: ...don`t drive fast, just fly low
- Мечтае да кара: E36 M3
Re: Смяна лайсните над прозореца - E36 купе
![]() от BT9028BA » 03 Яну 2010, 0:48
от BT9028BA » 03 Яну 2010, 0:48
deemov написа:Много полезна тема, а дали е трудно да се смънат непокътнати или после по-добре да земам нови
Номенклатурен номер : 51131977681
Описание : ЛАЙСНА ТАВАННА - ЧЕРНА , ЛЯВА
Ед.цена (с ДДС) : 54.25 BGN
Няма наличност
Дару Кар АД си запазва право за промени в цените
- Biogame
- старши ентусиаст
-

- Мнения: 1723
- Регистриран на: 17.04.2008
- Местоположение: Сливен
- Пол: Мъж
- Мечтае да кара: Всичко що е BMW
- Детайли за колата: E61 3.0d
E46 3.0i
Е60 545i
Re: Смяна лайсните над прозореца - E36 купе
![]() от Biogame » 03 Яну 2010, 14:44
от Biogame » 03 Яну 2010, 14:44
 А да попитам нещо за тези лайстни.
Възможно ли е от тях да влиза вода в купето???

- Smoocki
- старши ентусиаст
-
- Мнения: 2073
- Регистриран на: 6.08.2006
- Местоположение: София
- Пол: Мъж
- Кара: 600 коня с умивна на лицето
- Мечтае да кара: всичко бързо на четири гуми
- Детайли за колата: Garrett 3582
Re: Смяна лайсните над прозореца - E36 купе
![]() от Smoocki » 03 Яну 2010, 16:11
от Smoocki » 03 Яну 2010, 16:11
По скоро от тези на задните джамове
- jackass3D
- кандидат ентусиаст
-

- Мнения: 135
- Регистриран на: 3.03.2011
- Местоположение: Русе
- Пол: Мъж
- Кара: e91
- Мечтае да кара: Mach 1, Hemi Cuda и Chevy SS
- Детайли за колата: Много хубави :)
Re: Смяна лайсните над прозореца - E36 купе
![]() от jackass3D » 16 Май 2013, 22:48
от jackass3D » 16 Май 2013, 22:48
Здр. колеги и лек Up на темата. Та стана така, че и аз се сблъсквам с този проблем  понеже преди три дни купих колата и предните собственици са ги шкурили на място но не знам с каква цел, и вече са направо ръждиви. Та въпросът ми е, някой успял ли е да ги свали здрави и пак да ги монтира или си е взел нови. И знае ли някой от къде може да се закупят нови, и ако примерно няма в BG, може ли да се направи някъде поръчка на такива лайсни. Гледам ги в Дару кар по 160лв бр. ама ги няма налични, пък и цената е много груба. Благодаря предварително.
понеже преди три дни купих колата и предните собственици са ги шкурили на място но не знам с каква цел, и вече са направо ръждиви. Та въпросът ми е, някой успял ли е да ги свали здрави и пак да ги монтира или си е взел нови. И знае ли някой от къде може да се закупят нови, и ако примерно няма в BG, може ли да се направи някъде поръчка на такива лайсни. Гледам ги в Дару кар по 160лв бр. ама ги няма налични, пък и цената е много груба. Благодаря предварително.
- Smoocki
- старши ентусиаст
-
- Мнения: 2073
- Регистриран на: 6.08.2006
- Местоположение: София
- Пол: Мъж
- Кара: 600 коня с умивна на лицето
- Мечтае да кара: всичко бързо на четири гуми
- Детайли за колата: Garrett 3582
Re: Смяна лайсните над прозореца - E36 купе
![]() от Smoocki » 16 Май 2013, 23:08
от Smoocki » 16 Май 2013, 23:08
По показания начин се свалят без проблеми
- delas_328
- ентусиаст
-

- Мнения: 1044
- Регистриран на: 27.08.2009
- Местоположение: Пловдив
- Пол: Мъж
- Кара: 24 Клапанова гад!!!
- Мечтае да кара: М3 Е36 3.2
Re: Смяна лайсните над прозореца - E36 купе
![]() от delas_328 » 18 Май 2013, 19:51
от delas_328 » 18 Май 2013, 19:51
Супер темичка ,и моите са обелени и седят супер грозно ,направо се хващам да ги сваля още другата седмица,а със спрейче ако ги пръсна,естествено ще ги шприцовам предварително ?
По-добре известен пияч, отколкото анонимен алкохолик!
- zigo
- младши ентусиаст
-

- Мнения: 403
- Регистриран на: 31.03.2009
- Местоположение: София
- Пол: Мъж
- Кара: e46 328ci
Re: Смяна лайсните над прозореца - E36 купе
![]() от zigo » 19 Май 2013, 10:41
от zigo » 19 Май 2013, 10:41
въобще не е толко лесно колкото изглежда  аз вече 2ри комплект лаисни сменявам и все не стават както трябва
  даже ако някой гарантира че може да ми ги монтира перфектно да си каже колко парички на ЛС
даже ако някой гарантира че може да ми ги монтира перфектно да си каже колко парички на ЛС 
17 мнения
• Страница 1 от 2 • 1, 2
Кой е на линия
Потребители разглеждащи този форум: 0 регистрирани
Последни теми
Facebook

